Roberto Selbach

Random thoughts

Trying out Codex CLI

A while ago I was a little skeptical of AI-assisted coding. Mostly because my experience had been with CoPilot autocomplete and it was really not good. I still avoid AI autocomplete to this day, even if I can see it got better because I still find it distracting and often still not great.

That said, Claude Code shook my world view and I’ve been daily driving it ever since. I need to write a post about how I use this agent, but tl;dr I use it for the boring parts of coding and to help me read and review code (especially my own) instead of using it to write feature code.

I have been happy with Claude Code, but I also heard very good things about the new GPT-5 model for coding and wanted to check it out. Enter the Codex CLI. It’s OpenAI’s answer to Claude Code.

I am approaching this with a very open mind. I completely understand that it is early times in Codex CLI land and thus I did not expect it to have feature parity with Claude. I’m ok with that, just to get that out of the way.

The onboarding was rough

My first experience with it was that it wouldn’t install due to an issue in the post-install of a dependency (ripgrep, which, I must say, I already had installed.) I went to file a ticket and say that someone else had already done so.

No matter! I thought. I figured out how to get around it and then decided to try it. I opened a local repo and typed /init.

Codex decided it wanted to run tests to check the status of the repo. Fair enough, go ahead. It then failed to compile my Go code, claiming the Go toolchain wasn’t available. I was confused by that, so I closed Codex CLI and ran go version, all good. I ran my tests, all passed. Wut?

I tried again and this time I told it that I checked and I had the toolchain installed. It tried again, no dice. It kept trying until eventually I stopped and did some digging. That’s when I learned that Codex CLI runs inside a sandbox and doesn’t share my shell’s environment. Ok, that was a little upsetting. So I asked Codex CLI how we could provision the sandbox with Go. It proceeded to look for Go 1.13, which was release over six years ago. It asked me to download the tarball and leave it in a certain directory and it would take from there.

Ok, time for some more digging. It’s a this point that I must point out that the Codex CLI documentation is basically non-existent, and being a relatively newcomer, there’s not a lot of resources out there. Again, I get it, let’s just get through this initial steps.

I keep at it until I figure the issue: though my shell’s PATH includes Go 1.25, the sandbox’s did not. I couldn’t quite figure out why but I did manage to get it working by telling GPT where to find the Go binaries.

Once it got working

Now, once I got it working, things went a lot smoother. I quickly got used to the differences from Claude Code (and they are many) and got somewhat comfortable with it. I got GPT to analyze my code and look for bugs and it found a minor one that had escaped Claude for a long time. That was cool.

I found that it tends to be a little noisier than Claude Code, because CC tends to hide somethings behind its quirky verbs (“lampoonig…”, etc) This isn’t necessarily a negative, just different and something to get used to.

I miss the TODO lists that Claude Code creates and follows. Again, not a huge deal. The part that it needs to improve is tool calling. More than once I saw it calling some Go tool with bad parameters. And also, it doesn’t seem to quite grasp the error messages.

Case in point, I asked it to run a linter, so it started running golangci-lint, but it ran it at the root of the repo, where there are no Go files, and without parameters, which resulted in an error “No Go files”. It didn’t seem to understand this error and concluded golangci-lint wasn’t installed.

It then entered a loop trying the same command over and over again until I interrupted it and told it to pass ./... to include subdirectories. It then tried again with the parameters, but bizarrily this time it decided that the golangci-lint would be in ./bin, which is not true at all. So I had to tell it where to find it. And then it worked fine.

Conclusion

It’s early days and it’s clear there’s some ground to make up if they want to catch up, but I also remember the early days of Claude Code. The CC team iterated quickly and we got to where we are today, and I’m hoping the Codex team will do the same. They seem very active in answering questions on X, so I have hope.

I’m hopefuly and interested. I’ll keep an eye on it.

Cedilla in Fedora 2025

Years ago I posted about getting the c-cedilla (ç) working in Fedora when using the US International keyboard with deadkeys. This has been a struggle for decades now and every time I set up a new Linux installation, I need to look it up.

That wouldn’t be such a problem, weren’t for the fact that the way to accomplish this seemingly simple task keeps changing over the years, so most of the information you find online is awfully out of date.

So for 2025, based on my experience with Fedora 42 (the current version at time of writing) – I suspect it would work similarly with other distros, but I cannot confirm it – this is how I did it.

First add these two lines to /etc/environment –

export GTK_IM_MODULE=cedilla
export QT_IM_MODULE=cedillaCode language: Bash (bash)

And then in your home dir, add a file named .XCompose with this –

<dead_acute> <C>			: "Ç"	U0106 # LATIN CAPITAL LETTER C WITH CEDILLA
<dead_acute> <c>			: "ç"	U0107 # LATIN SMALL LETTER C WITH CEDILLACode language: HTML, XML (xml)

Then reboot and it should just work. To be fair, this is the easiest it’s been for years to get this done.

As a bonus, there are a few other changes that I’ve made in my .XCompose file to solve some annoyances I have with the US-intl keyboard in Linux. When I type fast, I tend to accidentally end up with a lot of mistakenly accented consonants that I don’t need in any of the languages I write in.

These are, of course, entirely up to you if you want them and have nothing to do with the cedilla. You can find them on Github.

Hopefully the search engine gods will help someone out there find this when they need it. Might just be me in the not-too-distant future.

How to Make :x Just Save Instead of Save and Quit

I’m going to leave this here in case someone out there is looking for the same thing, because this one was hard to figure out for me.

I’ve been using vim for a long time. Decades. Although it has never been my main editor (I used to be a proud emacs guy), vim is the editor I always go to when I need to edit something quickly.

My main editor these days is Visual Studio Code, with the VsCodeVim extension. I still use vim often from the vscode integrated terminal, which is ironic.

Anyway, after so many years using vim, I have developed muscle memory that is hard to let go of. I am very used to doing quick edits and using :x to save and exit. It’s a hard habit to quit.

But when working on vscode, this behaviour is not exactly ideal. I don’t need to close the active editor, so I decided to try and modify that behaviour by only saving the file instead of saving and closing the editor.

After a lot of trial and error and reading the extension source code, I finally found the solution:

"vim.normalModeKeyBindingsNonRecursive": [
    {
        "before": [ ":", "x", "<enter>" ],
        "commands": [ ":w" ]
    }
],
"vim.commandLineModeKeyBindingsNonRecursive": [
    {
        "before": [ "x" ],
        "commands": [ ":w" ]
    }
],Code language: JavaScript (javascript)

In both cases, I am replacing :x with :w, which is the behaviour I want. But this needs to be done in two different ways. When the editor is in NORMAL mode, we need to look for the entire sequence of commands (:x<enter>).

But if you type in : and wait a second, the editor will enter command line mode, in which we then need to capture the command (x) and then replace it with the :w command.

Hopefully this will show up on a search engine or AI output that will help someone out there not have to spend as much time as I did trying to look for this solution.

X-Touch Mini for Flight Simulation

Since I was a kid, I’ve loved aviation. Being poor and all, I could never dream of pursuing it in real life, so flightsimming has been my “cheap” fix for many years. I put cheap in quotes because this is an expensive hobby, even if you don’t overdo it. Although I spend quite a lot of money on software, I try to keep things in check on the hardware department, as flightsim equipment can be very expensive. For GA flying, it would be great to have a G1000, but at $2,199 USD, that’s a no from me.

Also, I’ve long flown the Boeing 737NG series, and setting up the MCP (the autopilot panel) with the mouse is quite the immersion killer, not to mention quite hard during busy phases of a flight. But € 1,299 is also not worth it, in my opinion.

That said, I’d really like some hardware controls. And that’s when I ran into the Behringer X-Touch Mini. The X-Touch Mini is not made for flightsimming, though; it’s a MIDI controller and as such, it doesn’t have the “niche tax.” I got it from Amazon at $180 CAD.

With some tinkering, I could make this control many planes, from the B737 to the Twin Otter. It’s great. I’ve long used SPAD.neXt to control all my planes for two reasons:

  1. I like tinkering with LVARs and also most third-party planes don’t expose all their controls to the simulator
  2. I like the fact that it autoswitches to the correct control profile for whatever plane I’m using

As an example, here’s how I set up a knob to control the checklists on the Honda Jet.

A screenshot of SPAD.neXt

It’s amazing! Also, I’ve been flying the ATR72-600 lately. Great plane! Also, it is similar enough to the Bombardier DHC8 (a.k.a. Dash-8) that it scratches my itch to fly regional Canadian routes, so I followed the excellent Les O’Reilly’s tutorial on setting the X-Touch Mini up for the ATR 72-600. Seriously, if you want to learn SPAD.neXt, check out his channel, it’s great.

However, I ran into an issue.

X-Touch Mini Leds not working

I could not get my leds to work with SPAD.neXt. No matter what I sent to the channel, the leds would not respond. I rewatched Les’ video, searched forums all over and never saw anyone having the same issue. I started suspecting a hardware problem. Eventually, I downloaded the editor from the Behringer’s website, solely for the purpose of seeing if I could get the leds to activate with it, to discard a hardware issue. This is when I found this —

Screenshot of the X-Touch Mini editor with the Global CH field highlighted

For some reason, my X-Touch Mini came with the global channel set to channel 12, instead of channel 1 as, it seems, is the normal setting. This is why none of the settings worked, so if you run into the same issue, now you know. So to fix this, there are two possibilities:

  1. Change all your SPAD.neXt settings to send the command to channel 11 (the channels are actually 0-based, so channel 12 in the UI is actually channel 11 in SPAD.neXt); or
  2. Change the global channel in the Behringer editor to 1 — which will be default channel 0 in SPAD.neXT. This is what I’ve done.

Once that was done, everything worked perfectly. The LEDs change status even if a channel happens inside the simulator, so you can rely on them to know the current status of your automatics and navigation/comms. Really happy with the setup.

Impressions on the Keychron Q6

I’ve had a soft spot for mechanical keyboards for a long time. It’s a cliché, I know. I’m not a fan of loud mechanical keyboards, mind you. I’ve had my hands on Cherry MX Blues and found them to be so loud as to be a distraction during calls. And I found the Cherry MX Reds to be, well, too quiet. I found the Goldilocks zone to be in the Gateron MX Browns.

I have also come to particularly like the Keychron keyboards. They have a bit of a shaky reputation online, but I’ve never had any problems with my Keychrons and I adore them. This Keychron K8 with Gateron Brows keys has been my main keyboard for the last 2-3 years.

Picture of a Keychron K8 keyboard

It is an awesome keyboard. I like how it feels, I like how it sounds, and I like how it clicks. It’s great.

The only thing my K8 lacked was a numpad, and since I have a certain passion for flight simulation, a numpad is something useful. I could buy a USB numpad. But where’s the fun in that? So this was the beginning of my search for a new keyboard.

After some online conversations, I settled for another Keychron favourite, the K4.

A picture of a Keychron K4 keyboard

And this keyboard feels amazing. I cannot stress this enough: it’s the most pleasurable clicking experience of my life. In theory, it has the same Gateron G Pro Browns as my K8, but for some reason, it feels better. I’m not sure how else to put this: they feel less metallic-y. I don’t know how else to put it.

Great size, great feel, great quality. I fell in love with this keyboard the moment I unboxed it. Except it has a terrible flaw that might be evident from the picture, but that I never noticed until I started using it. Do you see it? It’s right there by the arrow keys. Do you see it now?

There’s no spacing. The arrows are right under the Enter key but there’s no padding space between them and, say, the 0 key on the numpad. Years of muscle memory down the drain. I could not reliably hit the arrows without looking. I tried. The layout of the Del, End, PgUp, PgDown keys was also a bit foreign to me, although I was able to adapt relatively quickly to them. The arrows keys though, I simply could not. I replaced them with some texturized rubber keys but I was still unable to hit them reliably. It was a pity.

Enter the mighty QMK Q6.

A picture of a Keychron Q6 keyboard

This keyboard is a beast! It weights 2.5Kg, which is insane. But OMG it feels so, so good. If I had to choose, I would still pick the feel of the K4, but it’s close. The Q6 has better keycaps though.

In terms of sound, it sounds very close to the K8, maybe a tad softer but it’s hard to tell. In terms of feel, it’s between the K4 and K8. It feels closer to the K8 than to the K4, but yeah, somewhat in the middle between the two.

I love it. I credit it for the fact that I am writing this right now: I just feel like typing! I really like this. As an additional bonus, its firmware’s source code is open source. I don’t plan to use it for anything, but it’s good to know.

However, it is not perfect. Don’t get me wrong: I’m very happy with this keyboard but it does have one extremely questionable design decision that I honestly can’t understand: it doesn’t have feet. It just lies flat on the desk which feels quite awkward to me. I cannot understand the decision to do that. I solved it with some cheap adhesive rubber feet, so all is good, but why Keychron decided to ship it like this is beyond. So be aware of this.

Other than that, I absolutely love it.

In which I reminisce about the last few years

I just checked and it’s been exactly 1,594 days since I last posted on this blog. That’s 4 years, 4 months, and 12 days. This was, as is often the case with these, not planned. When I last wrote something here, I was working in a team set up as an R&D lab. Work felt quite fun and exciting and writing about it felt natural.

I then changed to jobs to a startup where things felt a tad different. It was a weird time for me: I met some great people there, people I still talk to and call friends. We put together a small team where I got to do some of the most fun work. Some of the people in that team I still talk to every single day. We’re still trying to put the group back together in some form in another company. And yet, my time in that company, outside that small team, made me feel quite small and inadequate. Writing about it did not feel natural.

I then joined HashiCorp, a company I’ve admired for years. I won’t go as far as saying this was a dream of mine, but when I got the offer, it sort of felt like it. I’ve been here for about two and a half years now and I’ve met some extremely brilliant people, and a few that I can call friends. I should have written about it. I wish I had. But by this time, the writing habit was already gone and life does what life does.

What else happened over the last few? Well, we became Canadian citizens. That was a blast, even if pandemic-style remove ceremony was a bit awkward.

We bought a house and got a new dog, Loki. He’s an English Cocker Spaniel, as would be expected of us, as he’s our 5th —

All in all, I can’t complain. On the other hand, I am getting older, which sucks, let me tell you that.

Anyway, I’d like to get back to writing a bit, I used to enjoy it quite a bit. We’ll see. Hopefully it won’t be another four years until the next post.

The Last of Us Part II

I’ve finished the game last night. I haven’t stopped thinking about it ever since. It was, to be very honest, a transformative experience, as far as videogames go. I understand why some people hate it and I’m sorry because I understand how much it sucks when you want to enjoy something but can’t. Art is subjective and no one is right or wrong.

That said, I want to talk about what I’ve experienced. Again, this is my experience with the game. I’m sure yours will be different and it is fine. If you hate this game, you’re not wrong. You feel what you feel.

With that out of the way, let me begin with the least controversial theme: the gameplay.

Gameplay

I thought the gameplay was an improvement on the first game. I don’t mean only the added functionality like ropes, and dogs tracking you. But the mission structures were more varied and some of them were, well, epic.

The sky bridge was awesome. So was trying to get near the sniper (Tommy) by advancing behind cover. The stalkers were a fun addition which gave me a lot of jump scares. That huge new infected monster at ground zero was… argh! Kill it now! The entire time spent on the seraphite island was amazing.

I also loved little things like figuring out the code for the safes.

The Story

This is what is dividing people, and it’s fine. Art that everybody agrees on is boring. The way I see the story, it is one of mirrored character journeys (as much of popular culture is.) Through three characters, we see the same journey at different points. I think this is genius. Here’s how I figure.

Joel

First all all, yes, it sucked to see him killed. That’s the point: we are supposed to be angry that he’s dead, that he’s killed in such a way. This is very much intended: it puts us in the place of Ellie. It is perfectly expected that you’d feel rage towards his killers. I think it becomes a problem when that rage is instead directed towards the game itself, a work of fiction, because then it makes it really hard to appreciate the rest of it.

Let’s talk about his character journey, shall we? In the first part, we meet Joel at the onset of the pandemic. We don’t know much about him before then but all signs point to an average joe and a good dad. Then his daughter gets murdered and we skip 20 years, by which time we are to understand that Joel is not a good man anymore. We learn that he was a killer, a robber, smuggler. He says he killed innocent people, he robbed (and presumably killed) good samaritans. He absolutely did not care for Ellie in the least at first. He wanted to abandon her to the soldiers and run when they caught up to them in Boston. It was Tess who made him stop.

In the first game, Joel was a “bad person,” a broken man who then had his redemption by protecting (and ultimately caring for) Ellie. (More on the “bad person” in quotes later.)

Abby

Abby’s journey is the same as Joel’s. Her dad gets murdered by a smuggler and that breaks her. She becomes a bad person. We’re made to understand that prior to the events in Seattle, she was a cold-hearted killer. She rose though the ranks of the WLF by becoming the “top scar killer” and even her friends think she’s, to steal Mel’s description, piece of sh*t. She’s a murderer.

And then comes Lev. At first, she too doesn’t care too much. He is just a scar. You see how Abby dehumanizes the seraphites all the time, the difficulty she has with ever calling them anything other than “scars.” She leaves them there but then she feels guilty and, reluctantly at first, goes back to them.

Abby was a “bad person” who had her redemption by protecting and caring for Lev. In a way, Abby’s journey is what we would have seen if we were able to follow Joel through those 20 skipped years.

Ellie

This is where things get interesting. Ellie is living in Jackson the life that Joel and Abby lived before their own traumatic events. When Joel dies, this matches the deaths of Joel’s daughter and Abby’s father. This is where Ellie is going to turn bad.

And we see that transformation unfold. We see our Ellie slowly go down the same path that Abby and Joel took years before and that we never got to see. She is consumed by rage.

Ellie is now becoming a “bad person” as well. But she’s not all the way there yet.

She’s also consumed by remorse. When she tortures Nora, she comes back to Dina visibly shaking and saying “I made her talk…” She’s devastated about what she’s done. Later she kills Owen and pregnant Mel, and again, that breaks her. And yet, she cannot stop.

Ellie vs Abby: why didn’t Ellie kill her?

The final confrontation is amazing. Abby is now in a different place, she’s now where Joel was after Ellie. It’s hard for us to forgive her, because we have seen her kill Joel, but nevertheless, that’s the place she is in. When Ellie cuts her down from that beach post, her first reaction is to run and cut Lev down. Lev is her Ellie. She doesn’t want to fight Ellie, she only wants to save Lev, just like Joel only cared about saving Ellie at the end.

But Ellie still can’t let go. She needs this! Or so she thinks. And so they fight. The fight fell heavy and, to me, very real. It was amazing and painful to watch and even worse to participate in. I did not want to fight Abby. All I wanted was for those two women to find peace now.

And then Ellie is about to kill her and she remembers Joel. More specifically, she remembers her very last conversation with Joel, about her inability to forgive but willingness to try. She also sees the changed man, who changed for and because of her, the man who went from “bad” to a “good” person. Killing Abby — who’s now on her own redemption path — will only turn Ellie into the bad person that Abby and Joel were.

And Ellie stops the cycle. She will not go down the same road. She honours Joel by refusing to become a bad person, something Joel would never have wanted for her. She will honour Joel by going back to the life both of them wanted for her.

Will she get it? Will JJ and Dina be waiting back in Jackson? We may never know, but I sure hope so.

“Bad people”

I think the biggest takeaway for me in this painful, yet wonderful journey of a game is how none of the protagonists were good or bad. Everybody is the hero of their own story. Since we played the first game as Joel with Ellie, that is our story and we are entirely on their side. But they were not “good,” not when it comes to the many lives they took over the course of their journey. We saw all those kills as completely justified: they were goons, they were going to shoot us! But then, from their perspective, they were doing the same thing we were. And the thing is, that doesn’t mean everyone is equally justified. It only means that from their own points of view, Ellie and Joel were the villains.

If doesn’t matter if we believe Joel was justified in taking Ellie from the hospital: from the point of view of Abby, her loving dad was murdered. It’s also not about convincing you and me that there are not moral absolutes. It’s that none of this matters to the characters themselves.

Conclusions

Again, I’ve finished this game almost 24 hours ago and I am still thinking about it. This game made me feel so many feelings. It made me mad, sad, and happy. Art that gets you to feel something is, well, good art in my book.

If you hated this game, it’s fine. We can’t all love the same thing. I am not trying to convince anyone, just sharing what I felt. I absolutely loved it with all my heart. This game will stay with me for a long time.

Zero values in Go and Lazy Initialization

I’m a big fan of the way Go does zero values, meaning it initializes every variable to a default value. This is in contrast with the way other languages such as, say, C behave. For instance, the printed result of the following C program is unpredictable.

#include <stdio.h>

int main(void) {
    int i;
    printf("%d\n", i);
    return 0;

}

The value of i will be whatever happens to be at the position in memory where the compiler happened to allocate the variable. Contrast this with the equivalent program in Go —

package main

import "fmt"

func main() {
    var i int
    fmt.Println(i)
}

This will always print 0 because i is initialized by the compiler to the default value of an int, which happens to be 0.

This happens for every variable of any type, including our own custom types. What’s even cooler is that this is done recursively, so if you the fields inside a struct will also be themselves initialized.

I strive to make all my zero values useful, but it’s not always that simple. Sometimes you need to use different default values for your fields, or maybe you need to initialize one of those fields. This is especially important when we remember that the zero value of a pointer is nil.

Imagine the following type —

type Foobar struct {
    db *DB
}

func NewFoobar() *Foobar {
    return &Foobar{db: DB.New()}
}

func (f *Foobar) Get(key string) (*Foo, error) {
    foo, err := db.Get(key)
    if err != nil {
        return nil, err
    }
    return foo, nil
}

In the example above, our zero value is no longer useful: we’d cause a runtime error because db will be nil inside the Get() function. We’re forced to call NewFoobar() before using our functions.

But there’s a simple trick to make the Foobar zero value useful again. As it turns out, being lazy sometimes pays off. Our technique is called lazy initialization

type Foobar struct {
    dbOnce sync.Once
    db *DB
}

// lazy initialize db
func (f *Foobar) lazyInit() {
    f.dbOnce.Do(func() {
        f.db = DB.New()
    })
}

We added a sync.Once to our type. From the Go docs:

Once an object that will perform exactly one action.

The function we pass to sync.Once.Do() is guaranteed to run once and only once, so it is perfect for initializations. Now we can call lazyInit() at the top of our exported function and it will ensure db is initialized —

func (f *Foobar) Get(key string) (*Foo, error) {
    f.lazyInit()

    foo, err := db.Get(key)
    if err != nil {
        return nil, err
    }
    return foo, nil
}

...

var f Foobar
foo, err := f.Get("baz")

We are now free to use our zero value with no additional initialization. I love it.

Of course, it is not always possible to use zero values. For example, our Foobar assumes a magical object DB that can be initialized by itself, but in real life we probably need to connect to an external database, authenticate, etc and then pass the created DB to our Foobar.

Still, using lazy initialization allows us to make a lot of objects’ zero values useful that would otherwise not be.

Playing with Go module proxies

(This article has been graciously translated to Russian here. Huge thanks to Akhmad Karimov.)

I wrote a brief introduction to Go modules and in it I talked briefly about Go modules proxies and now that Go 1.11 is out, I thought I’d play a bit these proxies to figure our how they’re supposed to work.

Why

One of the goals of Go modules is to provide reproducible builds and it does a very good job by fetching the correct and expected files from a repository.

But what if the servers are offline? What if the repository simply vanishes?

One way teams deal with these risks is by vendoring the dependencies, which is fine. But Go modules offers another way: the use of a module proxy.

The Download Protocol

When Go modules support is enabled and the go command determines that it needs a module, it first looks at the local cache (under $GOPATH/pkg/mods). If it can’t find the right files there, it then goes ahead and fetches the files from the network (i.e. from a remote repo hosted on Github, Gitlab, etc.)

If we want to control what files go can download, we need to tell it to go through our proxy by setting the GOPROXY environment variable to point to our proxy’s URL. For instance:

export GOPROXY=http://gproxy.mycompany.local:8080

The proxy is nothing but a web server that responds to the module download protocol, which is a very simple API to query and fetch modules. The web server may even serve static files.

A typical scenario would be the go command trying to fetch github.com/pkg/errors:

The first thing go will do is ask the proxy for a list of available versions. It does this by making a GET request to /{module name}/@v/list. The server then responds with a simple list of versions it has available:

v0.8.0
v0.7.1

The go will determine which version it wants to download — the latest unless explicitly told otherwise1. It will then request information about that given version by issuing a GET request to /{module name}/@v/{module revision} to which the server will reply with a JSON representation of the struct:

type RevInfo struct {
    Version string    // version string
    Name    string    // complete ID in underlying repository
    Short   string    // shortened ID, for use in pseudo-version
    Time    time.Time // commit time
}

So for instance, we might get something like this:

{
    "Version": "v0.8.0",
    "Name": "v0.8.0",
    "Short": "v0.8.0",
    "Time": "2018-08-27T08:54:46.436183-04:00"
}

The go command will then request the module’s go.mod file by making a GET request to /{module name}/@v/{module revision}.mod. The server will simply respond with the contents of the go.mod file (e.g. module github.com/pkg/errors.) This file may list additional dependencies and the cycle restarts for each one.

Finally, the go command will request the actual module by getting /{module name}/@v/{module revision}.zip. The server should respond with a byte blob (application/zip) containing a zip archive with the module files where each file must be prefixed by the full module path and version (e.g. github.com/pkg/errors@v0.8.0/), i.e. the archive should contain:

github.com/pkg/errors@v0.8.0/example_test.go
github.com/pkg/errors@v0.8.0/errors_test.go
github.com/pkg/errors@v0.8.0/LICENSE
...

And not:

errors/example_test.go
errors/errors_test.go
errors/LICENSE
...

This seems like a lot when written like this, but it’s in fact a very simple protocol that simply fetches 3 or 4 files:

  1. The list of versions (only if go does not already know which version it wants)
  2. The module metadata
  3. The go.mod file
  4. The module zip itself

Creating a simple local proxy

To try out the proxy support, let’s create a very basic proxy that will serve static files from a directory. First we create a directory where we will store our in-site copies of our dependencies. Here’s what I have in mine:

$ find . -type f
./github.com/robteix/testmod/@v/v1.0.0.mod
./github.com/robteix/testmod/@v/v1.0.1.mod
./github.com/robteix/testmod/@v/v1.0.1.zip
./github.com/robteix/testmod/@v/v1.0.0.zip
./github.com/robteix/testmod/@v/v1.0.0.info
./github.com/robteix/testmod/@v/v1.0.1.info
./github.com/robteix/testmod/@v/list


These are the files our proxy will serve. You can find these files on Github if you’d like to play along. For the examples below, let’s assume we have a devel directory under our home directory; adapt accordingly.

$ cd $HOME/devel
$ git clone https://github.com/robteix/go-proxy-blog.git

Our proxy server is simple (it could be even simpler, but I wanted to log the requests):

package main

import (
    "flag"
    "log"
    "net/http"
)

func main() {
    addr := flag.String("http", ":8080", "address to bind to")
    flag.Parse()

    dir := "."
    if flag.NArg() > 0 {
        dir = flag.Arg(0)
    }

    log.Printf("Serving files from %s on %s\n", dir, *addr)

    h := handler{http.FileServer(http.Dir(dir))}

    panic(http.ListenAndServe(*addr, h))
}

type handler struct {
    h http.Handler
}

func (h handler) ServeHTTP(w http.ResponseWriter, r *http.Request) {
    log.Println("New request:", r.URL.Path)
    h.h.ServeHTTP(w, r)
}

Now run the code above:

$ go run proxy.go -http :8080 $HOME/devel/go-proxy-blog
2018/08/29 14:14:31 Serving files from /home/robteix/devel/go-proxy-blog on :8080
$ curl http://localhost:8080/github.com/robteix/testmod/@v/list
v1.0.0
v1.0.1

Leave the proxy running and move to a new terminal. Now let’s create a new test program. we create a new directory $HOME/devel/test and create a file named test.go inside it with the following code:

package main

import (
    "github.com/robteix/testmod"
)

func main() {
    testmod.Hi("world")
}

And now, inside this directory, let’s enable Go modules:

$ go mod init test

And we set the GOPROXY variable:

export GOPROXY=http://localhost:8080

Now let’s try building our new program:

$ go build
go: finding github.com/robteix/testmod v1.0.1
go: downloading github.com/robteix/testmod v1.0.1

And if you check the output from our proxy:

2018/08/29 14:56:14 New request: /github.com/robteix/testmod/@v/list
2018/08/29 14:56:14 New request: /github.com/robteix/testmod/@v/v1.0.1.info
2018/08/29 14:56:14 New request: /github.com/robteix/testmod/@v/v1.0.1.mod
2018/08/29 14:56:14 New request: /github.com/robteix/testmod/@v/v1.0.1.zip

So as long as GOPROXY is set, go will only download files from out proxy. If I go ahead and delete the repository from Github, things will continue to work.

Using a local directory

It is interesting to note that we don’t even need our proxy.go at all. We can set GOPROXY to point to a directory in the filesystem and things will still work as expected:

export GOPROXY=file://home/robteix/devel/go-proxy-blog

If we do a go build now2, we’ll see exactly the same thing as with the proxy:

$ go build
go: finding github.com/robteix/testmod v1.0.1
go: downloading github.com/robteix/testmod v1.0.1

Of course, in real life, we probably will prefer to have a company/team proxy server where our dependencies are stored, because a local directory is not really much different from the local cache that go already maintains under $GOPATH/pkg/mod, but still, nice to know that it works.

There is a project called Athens that is building a proxy and that aims — if I don’t misunderstand it — to create a central repository of packages à la npm.


  1. Remember that somepackage and somepackage/v2 are treated as different packages. 
  2. That’s not strictly true as now that we’ve already built it once, go has cached the module locally and will not go to the proxy (or the network) at all. You can still force it by deleting $GOPATH/pkg/mod/cache/download/github.com/robteix/testmod/ and $GOPATH/pkg/mod/github.com/robteix/testmod@v1.0.1

Introduction to Go Modules

This post is also available in other languages:

The upcoming version 1.11 of the Go programming language will bring experimental support for modules, a new dependency management system for Go. A few days ago, I wrote a quick post about it. Since that post went live, things changed a bit and as we’re now very close to the new release, I thought it would be a good time for another post with a more hands-on approach. So here’s what we’ll do: we’ll create a new package and then we’ll make a few releases to see how that would work.

Creating a Module

So first things first. Let’s create our package. We’ll call it “testmod”. An important detail here: this directory should be outside your $GOPATH because by default, the modules support is disabled inside it. Go modules is a first step in potentially eliminating $GOPATH entirely at some point.

$ mkdir testmod
$ cd testmod

Our package is very simple:

package testmod

import "fmt" 

// Hi returns a friendly greeting
func Hi(name string) string {
   return fmt.Sprintf("Hi, %s", name)
}Code language: JavaScript (javascript)

The package is done but it is still not a module. Let’s change that.

$ go mod init github.com/robteix/testmod
go: creating new go.mod: module github.com/robteix/testmodCode language: JavaScript (javascript)

This creates a new file named go.mod in the package directory with the following contents:

module github.com/robteix/testmodCode language: JavaScript (javascript)

Not a lot here, but this effectively turns our package into a module. We can now push this code to a repository:

$ git init 
$ git add * 
$ git commit -am "First commit" 
$ git push -u origin masterCode language: JavaScript (javascript)

Until now, anyone willing to use this package would go get it:

$ go get github.com/robteix/testmodCode language: JavaScript (javascript)

And this would fetch the latest code in master. This still works, but we should probably stop doing that now that we have a Better Way™. Fetching master is inherently dangerous as we can never know for sure that the package authors didn’t make change that will break our usage. That’s what modules aims at fixing.

Quick Intro to Module Versioning

Go modules are versioned, and there are some particularities with regards to certain versions. You will need to familiarize yourself with the concepts behind semantic versioning.

More importantly, Go will use repository tags when looking for versions, and some versions are different of others: e.g. versions 2 and greater should have a different import path than versions 0 and 1 (we’ll get to that.) As well, by default Go will fetch the latest tagged version available in a repository. This is an important gotcha as you may be used to working with the master branch. What you need to keep in mind for now is that to make a release of our package, we need to tag our repository with the version. So let’s do that.

Making our first release

Now that our package is ready, we can release it to the world. We do this by using version tags. Let’s release our version 1.0.0:

$ git tag v1.0.0
$ git push --tags

This creates a tag on my Github repository marking the current commit as being the release 1.0.0.

Go doesn’t enforce that in any way, but a good idea is to also create a new branch (“v1”) so that we can push bug fixes to.

$ git checkout -b v1
$ git push -u origin v1

Now we can work on master without having to worry about breaking our release.

Using our module

Now we’re ready to use the module. We’ll create a simple program that will use our new package:

package main

import (
 	"fmt"

 	"github.com/robteix/testmod"
)

func main() {
 	fmt.Println(testmod.Hi("roberto"))
}Code language: JavaScript (javascript)

Until now, you would do a go get github.com/robteix/testmod to download the package, but with modules, this gets more interesting. First we need to enable modules in our new program.

$ go mod init mod

As you’d expect from what we’ve seen above, this will have created a new go.mod file with the module name in it:

module modCode language: JavaScript (javascript)

Things get much more interesting when we try to build our new program:

$ go build
go: finding github.com/robteix/testmod v1.0.0
go: downloading github.com/robteix/testmod v1.0.0

As we can see, the go command automatically goes and fetches the packages imported by the program. If we check our go.mod file, we see that things have changed:

module mod
require github.com/robteix/testmod v1.0.0Code language: JavaScript (javascript)

And we now have a new file too, named go.sum, which contains hashes of the packages, to ensure that we have the correct version and files.

github.com/robteix/testmod v1.0.0 h1:9EdH0EArQ/rkpss9Tj8gUnwx3w5p0jkzJrd5tRAhxnA=
github.com/robteix/testmod v1.0.0/go.mod h1:UVhi5McON9ZLc5kl5iN2bTXlL6ylcxE9VInV71RrlO8=

Making a bugfix release

Now let’s say we realized a problem with our package: the greeting is missing ponctuation! People are mad because our friendly greeting is not friendly enough. So we’ll fix it and release a new version:

// Hi returns a friendly greeting
func Hi(name string) string {
-       return fmt.Sprintf("Hi, %s", name)
+       return fmt.Sprintf("Hi, %s!", name)
}Code language: JavaScript (javascript)

We made this change in the v1 branch because it’s not relevant for what we’ll do for v2 later, but in real life, maybe you’d do it in master and then back-port it. Either way, we need to have the fix in our v1 branch and mark it as a new release.

$ git commit -m "Emphasize our friendliness" testmod.go
$ git tag v1.0.1
$ git push --tags origin v1Code language: JavaScript (javascript)

Updating modules

By default, Go will not update modules without being asked. This is a Good Thing™ as we want predictability in our builds. If Go modules were automatically updated every time a new version came out, we’d be back in the uncivilized age pre-Go1.11. No, we need to tell Go to update a modules for us.

We do this by using our good old friend go get:

  • run go get -u to use the latest minor or patch releases (i.e. it would update from 1.0.0 to, say, 1.0.1 or, if available, 1.1.0)
  • run go get -u=patch to use the latest patch releases (i.e., would update to 1.0.1 but not to 1.1.0)
  • run go get package@version to update to a specific version (say, github.com/robteix/testmod@v1.0.1)

In the list above, there doesn’t seem to be a way to update to the latest major version. There’s a good reason for that, as we’ll see in a bit.

Since our program was using version 1.0.0 of our package and we just created version 1.0.1, any of the following commands will update us to 1.0.1:

$ go get -u
$ go get -u=patch
$ go get github.com/robteix/testmod@v1.0.1Code language: JavaScript (javascript)

After running, say, go get -u our go.mod is changed to:

module mod
require github.com/robteix/testmod v1.0.1Code language: JavaScript (javascript)

Major versions

According to semantic version semantics, a major version is different than minors. Major versions can break backwards compatibility. From the point of view of Go modules, a major version is a different package completely. This may sound bizarre at first, but it makes sense: two versions of a library that are not compatible with each other are two different libraries.

Let’s make a major change in our package, shall we? Over time, we realized our API was too simple, too limited for the use cases of our users, so we need to change the Hi() function to take a new parameter for the greeting language:

package testmod

import (
 	"errors"
 	"fmt" 
) 

// Hi returns a friendly greeting in language lang
func Hi(name, lang string) (string, error) {
 	switch lang {
 	case "en":
 		return fmt.Sprintf("Hi, %s!", name), nil
 	case "pt":
 		return fmt.Sprintf("Oi, %s!", name), nil
 	case "es":
 		return fmt.Sprintf("¡Hola, %s!", name), nil
 	case "fr":
 		return fmt.Sprintf("Bonjour, %s!", name), nil
 	default:
 		return "", errors.New("unknown language")
 	}
}Code language: PHP (php)

Existing software using our API will break because they (a) don’t pass a language parameter and (b) don’t expect an error return. Our new API is no longer compatible with version 1.x so it’s time to bump the version to 2.0.0.

I mentioned before that some versions have some peculiarities, and this is the case now. Versions 2 and over should change the import path. They are different libraries now.

We do this by appending a new version path to the end of our module name.

module github.com/robteix/testmod/v2Code language: JavaScript (javascript)

The rest is the same as before, we push it, tag it as v2.0.0 (and optionally create a v2 branch.)

$ git commit testmod.go -m "Change Hi to allow multilang"
$ git checkout -b v2 # optional but recommended
$ echo "module github.com/robteix/testmod/v2" > go.mod
$ git commit go.mod -m "Bump version to v2"
$ git tag v2.0.0
$ git push --tags origin v2 # or master if we don't have a branchCode language: PHP (php)

Updating to a major version

Even though we have released a new incompatible version of our library, existing software will not break, because it will continue to use the existing version 1.0.1. go get -u will not get version 2.0.0.

At some point, however, I, as the library user, may want to upgrade to version 2.0.0 because maybe I was one of those users who needed multi-language support.

I do it but modifying my program accordingly:

package main

import (
 	"fmt"
 	"github.com/robteix/testmod/v2" 
)

func main() {
 	g, err := testmod.Hi("Roberto", "pt")
 	if err != nil {
 		panic(err)
 	}
 	fmt.Println(g)
}Code language: JavaScript (javascript)

And then when I run go build, it will go and fetch version 2.0.0 for me. Notice how even though the import path ends with “v2”, Go will still refer to the module by its proper name (“testmod”).

As I mentioned before, the major version is for all intents and purposes a completely different package. Go modules does not link the two at all. That means we can use two incompatible versions in the same binary:

package main
import (
 	"fmt"
 	"github.com/robteix/testmod"
 	testmodML "github.com/robteix/testmod/v2"
)

func main() {
 	fmt.Println(testmod.Hi("Roberto"))
 	g, err := testmodML.Hi("Roberto", "pt")
 	if err != nil {
 		panic(err)
 	}
 	fmt.Println(g)
}Code language: JavaScript (javascript)

This eliminates a common problem with dependency management: when dependencies depend on different versions of the same library.

Tidying it up

Going back to the previous version that uses only testmod 2.0.0, if we check the contents of go.mod now, we’ll notice something:

module mod
require github.com/robteix/testmod v1.0.1
require github.com/robteix/testmod/v2 v2.0.0Code language: JavaScript (javascript)

By default, Go does not remove a dependency from go.mod unless you ask it to. If you have dependencies that you no longer use and want to clean up, you can use the new tidy command:

$ go mod tidy

Now we’re left with only the dependencies that are really being used.

Vendoring

Go modules ignores the vendor/ directory by default. The idea is to eventually do away with vendoring[^0]. But if we still want to add vendored dependencies to our version control, we can still do it:

$ go mod vendor

This will create a vendor/ directory under the root of your project containing the source code for all of your dependencies.

Still, go build will ignore the contents of this directory by default. If you want to build dependencies from the vendor/ directory, you’ll need to ask for it.

$ go build -mod vendor

I expect many developers willing to use vendoring will run go build normally on their development machines and use -mod vendor in their CI.

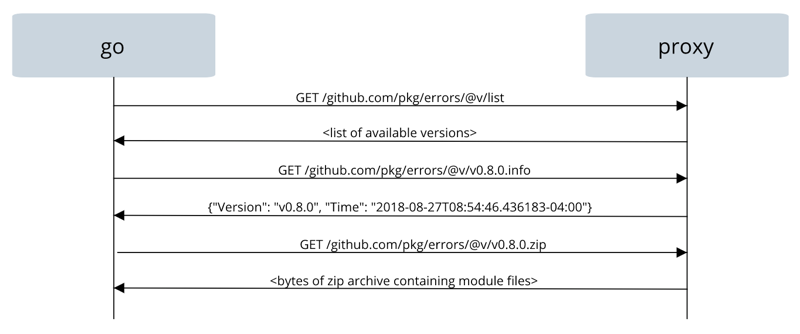
Again, Go modules is moving away from the idea of vendoring and towards using a Go module proxy for those who don’t want to depend on the upstream version control services directly.

There are ways to guarantee that go will not reach the network at all (e.g. GOPROXY=off) but these are the subject for a future blog post.

Conclusion

This post may seem a bit daunting, but I tried to explain a lot of things together. The reality is that now Go modules is basically transparent. We import package like always in our code and the go command will take care of the rest.

When we build something, the dependencies will be fetched automatically. It also eliminates the need to use $GOPATH which was a roadblock for new Go developers who had trouble understanding why things had to go into a specific directory.

Vendoring is (unofficially) being deprecated in favour of using proxies.[^0] I may do a separate post about the Go module proxy. (Update: it’s live.) [^0]: I think this came out a bit too strong and people left with the impression that vendoring is being removed right now. It isn’t. Vendoring still works, albeit slightly different than before. There seems to be a desire to replace vendoring with something better, which may or may not be a proxy. But for now this is just it: a desire for a better solution. Vendoring is not going away until a good replacement is found (if ever.)